And so, I am going to try to address some of the basic rules of photography that I have learned over the past 5 or so years. This is certainly not exhaustive, but if I were to give a bare-bones explanation of what I view to be the most important elements of photography, this is what I would come up with. Hopefully this will be somewhat systematic and organized. But this is kind of the first introduction to photography that I've ever shared, so please bare with me. I can't necessarily give you a dissertation on the technical components of photography, but hopefully what I offer will be helpful.
So let's start with the essentials.
The Camera. Probably the single biggest question people have for me - or other photographers - when they are impressed by a picture is: "What kind of camera do you have?" The short answer is that it doesn't really matter. It is not the camera that takes good pictures, it is the person behind that camera. A good photographer can take good pictures with a disposable camera, or a $5000 digital SLR camera. (SLR stands for "Single Lens Reflex," and to the layperson, it is essentially a camera that has detachable lenses.)
On the other hand, there are certain things you can do with a digital SLR camera that you cannot achieve with a point-and-shoot camera. Being able to control your exposure is perhaps the most important one. This allows you to vary your depth-of-field (which we will return to later), and that is one of the most important parts of photography, in my opinion.
So I would recommend to a person that they buy a digital SLR camera if they are wanting to get serious about photography (or even semi-serious). Although they are more expensive than an 'ol fashioned film SLR camera, in the long run it will be more cost-efficient. Not only are film cameras a thing of the past, but it costs a whole lot more money to operate one over the span of a couple of years. You may be able to find a decent film SLR camera for $200 or so, but when you take into account buying and developing film, the cost increases very quickly.
At the same time, the learning curve on a digital SLR is so much better because you have instant feedback on what you did right or wrong in a picture. When you have to wait a week or so to develop your film, you hardly remember what you did when you shot the picture, and so you don't learn and get better as quickly.
So what cameras would I recommend? There is an endless rivalry between Canon and Nikon, of course, but these aren't the only two brands on the market. However, I would probably recommend staying within those two brands because they have far more lenses available than other brands (like Pentax, for example). And lenses is really where it's at. I just bought a very inexpensive Canon lens this past summer for around $80, for example, and the same type of lens for a Sony camera was $280! Now, the Sony lens may have been better quality, in the end, but the point is that there were no lenses for Sony with the same specifications that I had for my Canon.
I, myself, am a Canon guy, because that's just what I started out with. And once you commit to a brand, you will probably stick with it because you don't want to keep having to buy new lenses for whatever brand you get. And so, if you are just starting out in photography and you'd like to get a digital SLR, I would recommend the Canon Rebel XSi. With Canon's generic lens, you can get it online for about $630 or so (available from Amazon for $648 here). The XSi is Canon's entry-level digital SLR, but it is really a high-quality camera. It will pretty much do all that you want to do, for the most part, even if you are a professional or semi-professional photographer (depending on what type of photography you are involved with).
Of course, as I said, Nikon is good as well. And, though I don't know as much about Nikon, I would guess that its Nikon D60 would be comparable to Canon's XSi (available here). So when it comes to Nikon or Canon, you really can't go wrong. Either one is good. It's just a matter of preference.
Before I finish with this section, let me just say a word or two about vendors. You need to be very careful about where you purchase your cameras and other equipment. If you go on Pricegrabber or other similar sites, there are other vendors that will sell you a camera for $100 cheaper than anywhere else. Usually, if something is too good to be true than it usually is. If you purchase from then, many times they are selling you the camera only, without batteries, or chargers, or other essentials. And then they will call you up to "confirm" that you will purchased the camera, and then try to sell you all these other ad-ons. You may finally get the camera, but it will be weeks after you initially purchased it, and after a great deal of hassle.
It is pretty well established that there are certain sites which are dependable and good. Perhaps the leading one is B & H Photo, which is out of New York. They are, far and away, the leading site in this particular industry, and they are very dependable. Their prices are usually a bit more expensive than other sites, but I usually always start with them. Sometimes I purchase from them if I don't want to deal with any hassling in other places, or sometimes I just use them as a price comparison.
I do also a lot of purchasing from Amazon.com. Sometimes the stuff is directly from their site, or oftentimes it is from third-party sites that sell through them. Amazon usually has some of the cheapest prices I've come across, yet they are very dependable and you know what you're getting. I also have free two-day shipping with them, because I'm a Prime member (about $70 a year), so when I purchase something from there, you get it very quickly. I've had only one experience with them that they didn't get it to me within two days, and that was more UPS's fault than theirs. With the Prime Membership, they will also overnight anything for you for, like, $5 an item - so that's a steal as well.
Lenses. As I mentioned earlier, lenses is where where it's at. The actual camera is important, but not as important as the lenses. Unless you are wanting to get into photography professionally, don't worry about buying a camera for $2000+. Putting money into lenses is perhaps more important than what camera body you have.
Here, it is a matter of what type of photography you are doing. Unless you buy a camera body only, the lens that comes with a camera will usually be something like an 18-55mm zoom lens. The 18mm part means that it is a fairly wide angle (meaning you can get more of a scene in a picture). The 55mm means you can zoom in a little more, and get a little closer in on the subject. However, it is not going to be as much a zoom as you may prefer.
Generally speaking, if you are interested in
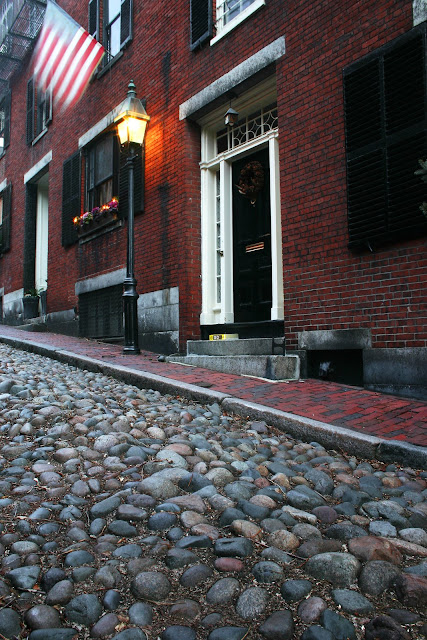 taking landscape or cityscape photography, you will want lenses that have wider angles. You will want the ability to get more in the picture, and so an 18mm lense or less is preferable. This is not always the case, of course, but when I'm taking a landscape or cityscape scene, I want a wider angle lens so that I can get more in the picture (th image to the right is an example. This was a very tight scene, and in order for me to get the street and building in the same frame, I had to be at about 18mm).
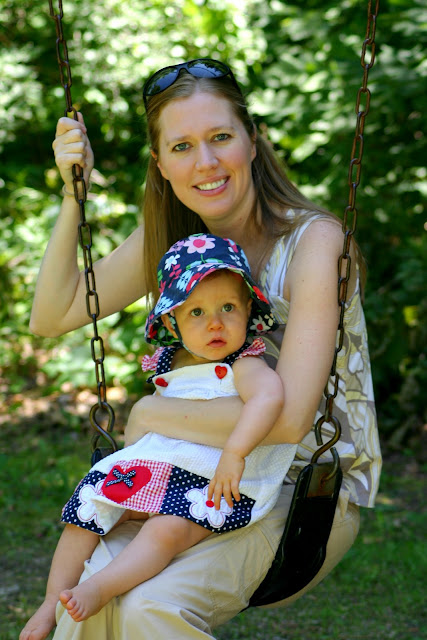
On the other hand, if you are taking pictures of people, you will probably want to use a longer lens. This allows you to get only those elements in the frame that you want and, as we will discuss below, it allows you to focus only on the subject that you are taking, blurring all other elements. The picture to the left is an example of this. I took this picture of my sister and her daugther this last summer with a 75-300mm lens, and it was at about 300mm. I could have gotten closer to her and shot it at 75mm as well, and probably gotten the same effect, but 300mm blurs the background even more, thus making the subject stand out even more.
 We will return to this topic a little later, but when taking pictures of people - especially if they are portraits - it is vitally important to zoom in on that person(s) as much as you can, cutting out any other elements. A longer lens allows you to do this. At the same time, it is also extremely important to have a small depth of field. This blurs all the other elements in the picture, and causes the subject to stand out more. We will return to this below.
This is probably what's most important about the subject of lenses. Perhaps the only other thing to say is that there are two different types of lenses: zoom lenses or prime lenses. Zoom lenses obviously have the ability to use different focal lengths. Thus, you can use a zoom lens to be at 18mm, for example, or 55mm. Prime lenses, on the other hand, are fixed in theri focal length. I have a 50mm prime lens, for example. That means that I cannot zoom in any closer than 50mm. The only way to achieve a closer crop is to actually get physically closer myself.
Each type has its advantages and disadvantages, but, generally speaking, prime lenses are actually a little more expensive and have their advantages. One of those advantages is that they have a fixed aperture (f-stop). We will return to this later, but for our purposes now, the advantage of having a fixed aperture is that, no matter what, you know how much light you will be able to let in through your lens. And this is highly advantageous. Again, more on this later.
The tripod. I will not spend a great deal of time on this here, but I will say that this is actually a very important topic. The tripod is, perhaps, the most underated part of photography. It took me a couple of years to realize its importance. It didn't make sense to me initially, but there are two big benefits of using a tripod. 1. It slows the process down. When you set your camera on the tripod, it actually forces you to slow down and you sometimes notice things you wouldn't otherwise notice if you were just holding the camera in your hand. Similarly, usuing a tripod and slowing down allows you to frame the picture in a way you maybe wouldn't be able to accomplish if you're just going the hand-held route.
2. Using a tripod allows you to use slower shutter speeds and, subsequently, makes your pictures "sharper." We will return to these two things later but, suffice it to say, being able to slow down your shutter speed and still have a sharp picture if very important.
So, use a tripod (especially if you want to take scenic/landscape/cityscape pictures). This will single-handedly improve your photography ten-fold. I am not going to get into the whole "what type of tripod" should you use. This is important, too, but you can find plenty of resources on other websites for that. Suffice it to say, however, it is vitally important that you do use a tripd - any tripod - when shooting.
Together with that you should have a wireless remote for your camera. Whenever you use a tripod you'll want to use this remote. This is because you want to have minimal contact with the camera when the exposure is being taken. The less you touch your camera, the less it will shake or vibrate, and the sharper the image will appear.
But now let's talk about the basics of actually taking a picture.
Exposure. I don't want to go into all the technical aspects of how exposure is defined, but essentially, exposure is definied by how a camera captures light. There are two elements that make up exposure: aperture and shutter speed. The aperture is the hole in the optical system that either gets larger or smaller, depending on how big or small you make the aperture. If the hole is larger then, obviously, more light will come in. If it is smaller then, obviously, less light will come in.
But the other part to it is the shutter speed. This is essentially the speed at which your shutter opens or closes to let that let go in through that aperture or hole. So, obviously, the longer your shutter is open, the more light will get in, and so on. Thus, in order to achieve the proper exposure (letting the right amount of light in), the aperture and shutter speed need to correspond appropriately.

How does a person know if there is enough light getting in, and whether the aperture and shutter speed are in the right relation? SLR cameras have what is called a "light meter." If you were to look through the viewfinder, you would notice this meter at the bottom of the "screen" (there is an example of this in the picture to the right). Though this picture doesn't show it, when you press the release button half way, a little arrow will start blinking below the light meter, and you will then try to get that blinking arrow right in the center. This is accomplished by moving changing the aperture or shutter speed or both. On digital SLR cameras, you can only change both if you are in the manual "M" setting mode. Otherwise, you will be able to change only the shutter speed (Tv mode), or the aperture (Av mode), or neither. The latter happens when your camera is set to any of the modes that has a picture (like the picture of the face, or the mountain, or flower, etc.) and the camera figures out the exposure for you. Thus, you don't have to worry about the shutter speed or aperture and the camera will allow the proper amount of light in automatically.
This is what most people do who are not experience photographers. And that is fine. There are a few problems with that, however. The first is that the camera doesn't always do the best job of letting in the proper amount of light. At the same time, even when you do it manually, the center line on the light meter may not be exactly what you're looking for, either, and sometimes you want that line to be a little to the right of the center (allowing more light to come in - this is called "overexposure"), or to the left of the line (allowing less light to come in - called "underexposure").
Aside from that, controlling your own aperture and shutter speed is extremely important. We'll deal with one, and then we'll deal with the other.
First, the size of your aperture determines the amount of your picture is in focus. Don't ask me about the physics of this, but the smaller the aperture/hole, the more of the picture will be in focus. This is usually preferable for a lot of pictures, but there is a catch. As we talked about before, if the hole is smaller, then that means there isn't as much light that is coming in. So, in order for you to have more light come in, you must slow the shutter down. But when you slow the shutter down, this makes it so that the camera is a lot more susceptible to shaking and movements. Thus, if you want to have a small aperture, this will slow the shutter down, thus usually making it necessary for the camera to be placed on a tripod so that it doesn't shake or vibrate as much.
What may be more confusing is that the size of the aperture and the number of the f-stop seem to be backwards. Thus, when you have a very small aperture, the f-stop is actually higher than
 when you have a very large aperture. So you need to think opposite. If you want to have more of your picture in focus, you will want to have a smaller aperture - which is actually a higher f-stop number. Thus, a small aperture, for example, would be something like f/22, whereas as a large aperture would be f/4. Like I said, this is a bit backwards, but just think: more in focus, higher f-stop number; less in focus: lower f-stop number.
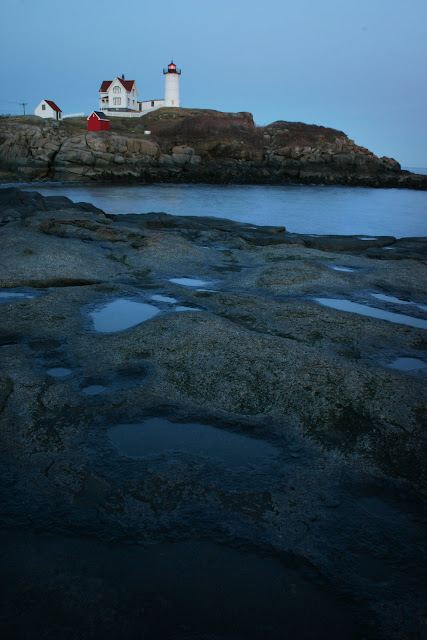
So why would a person want a smaller aperture/higher f-stop? This is usually preferable when taking landscape/cityscape pictures. When taking nice scenic pictures, you typically want as much as possible in focus. The image to the left is an example. I wanted as much of the scene in focus as possible. Not only did I want the foreground (rocks/puddles) in focus, but I also, of course, wanted the lighthouse in focus as well. Thus, my f-stop for this picture was f/22, allowing me to get as much of the scene in focus as possible. You don't necessarily have to go that high with your f-stop, but that's what I did. Anytime you get to f/9 or above, you are usually getting into good territory.
So why would a person want less of the picture in focus? Isn't focus good? Not necessarily, and this is the single biggest problem I see with inexperienced photographers. It is also the problem with point-and-shoot cameras. Point-and-shoot cameras usually have a pretty wide angle, and they also have a pretty large depth of field (high f-stop). Why is this problematic? Because most people take pictures of people, and in order to achieve good results when taking portrait shots or candids, the less that is in focus in a picture, the better. There are exceptions to this, but generally speaking, when taking portrait or candid shots of people, you only want to person or persons to be in focus. You want everything else to be blurred.
As I said, this is what many people do not understand. They get this really nice camera, hoping that they will be able to take wonderful pictures of their friends and family, and then they wonder why their pictures aren't as good as the wedding photographer that took pictures of their cousin at his wedding. This is because, time and time again, the "inexperienced" photographer simply turns the camera on automatic mode (which doesn't always give you a low f-stop) or they do it manually but, their f-stop is something like f/7 or f/9. That aperture setting is not going to blur enough of the other elements of the picture. It is not going to do the trick.
As a general rule, when I am taking a picture of someone, I usually have my f-stop at the lowest possible number the lens will allow me. This will create a "shallow depth of field" (the amount of the picture in focus) and cause the person in the picture to stand out. And this is somewhat the problem with zoom lenses. They don't have a fixed f-stop and when you zoom in on a subject (which is good) the minum f-stop will often go from f/3.5 or lower, to f/4 or f/5. But when you have a fixed lens, you know that that low f-stop will always remain the same, thus guaranteeing that you will be able to have a shallow depth of field.
Notice the two pictures below. Look at them and tell me which one causes the subject to stand out more.

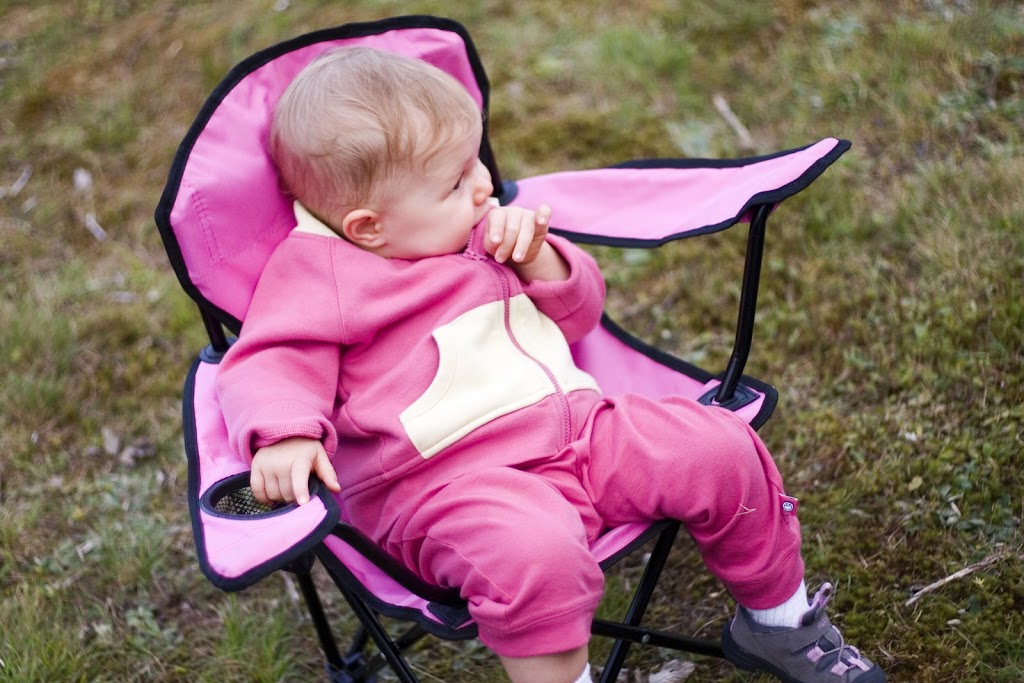
Now, the two pictures aren't exactly the same, of course. It's not like there are the same exact pictures, one with a shallow depth of field and the other without. But I think you get the point. In the second image, my niece Calleigh stands out more because she is the only thing in the picture that is in focus. The grass is totally out of focus. When you look at a picture, your eye naturally searches for something in focus. And so, if everything is in focus, then it will not necessarily go right to the subject of the picture. And that is not good. You want your eye to be drawn to the subject of the picture, and that subject needs to be in focus, first of all, and it is preferable if everything else is out of focus.
Now some may wonder: why would you ever worry about shutter speed, then? Quite simply,
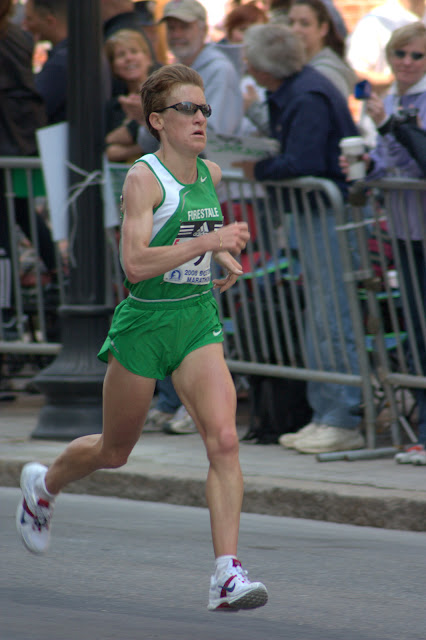 shutter speed can be extremely important when you want to either freeze a scene that is going fast (like an athlete), or give cause certain other elements to blur. The picture to the right is from the Boston Marathon. For obvious reasons I wanted to be able to get the woman in focus, but in order to do that I needed to have a very fast shutter speed. Otherwise, if my shutter speed was not very fast, she would have been blurry and out totally out of focus. Sometimes this is a nice effect, but generally when capturing people in action, you want to be able to stop them in their motion. Thus, when a football player is barreling down the sideline, you want to be able to "stop" him in his tracks, and this means that you have to have a fast shutter speed.
Achieving a fast enough shutter speed may be tricky, though. Sometimes it is not always easy to figure out just how fast is fast enough. And if the place where you are shooting is low lighting, then it may be hard to get a very fast shutter speed because, as you will remember, if you have a fast shutter speed, then it means that less light is getting in.
So how can you tell if you have enough shutter speed to stop action? I am not sure that I can totally explain it myself, but from what I understand, the speed of your shutter must be at least equivalent to the focal length of your lens that you are shooting with. Thus, if you have a 55mm lens, then your shutter speed must be at least 1/55th of a second. If you are shooting a scene at 300mm, then your shutter needs to be at least 1/300th of a second. More is preferable, of course, but this is the starting point.
However, what complicates matters a little bit is that with lower-end digital SLR cameras (like the Canon Rebel XSi or the Nikon D60) there is something called a cropping factor. Sensors on these cameras actually cause the focal length to multiply by 1.7 or so. Thus, if I have a 55mm lens, it is actually really equivalent to about 94mm, and I would thus need to have my shutter speed to be at least 1/94th of a second if I want to stop action.

There are many times when a slow shutter speed is preferable, on the other hand. This is often the case when you want to blur motion. Sometimes that is a neat effect. For example, if you take a picture of a waterfall, in order to portray a sense of movement and cause a very nice silky effect in the water, you will want to slow the shutter speed down. The picture to the left shows this perfectly. I actually slowed the shutter down to 2.5 seconds to get this effect, and with that reality, you can see why it is vitally important to use a tripod. Nobody that I know can hold anything in their hands completely still for 2.5 seconds.
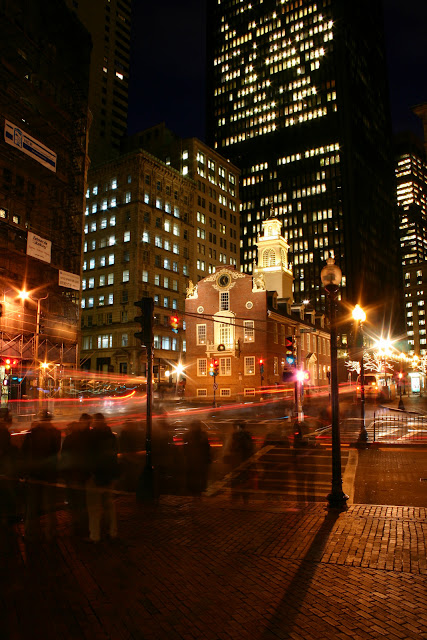
This slow shutter speed is also a nice effect when you're in the city, and you are wanting to emphasize the busy and bustling motion of city life. The picture to the right shows this. This is of the Old State house in Boston, taken with a shutter speed that actually lasted 13 seconds. Many times, a slow shutter speed can cause a nice effect, and as a person gets more well-versed in this technique, they can experiment with various scenes.
So that is probably all I will say about exposure at this point. But just to review:
- Large depth of field (high f-stop) is generally good for landscape and scenic shots, where you want a lot of the scene in focus
- Shallow depth of field (low f-stop) is vitally important for pictures of people, where you want the subject to stand out
- Fast shutter speed is necessary for stopping motion. This is often the case when taking pictures of people - especially if they are moving
- Slow shutter speed is nice for emphasizing motion and blurring things such as water, cars, lights, people, etc
- Large depth of field/slow shutter speed: you definitely need to use a tripod and wireless remote
- Shall depth of field/fast shutter speed: you don't necessarily need to use a tripod (especially if you are simply taking candid shots), but it can still be handy


No comments:
Post a Comment