Monday, February 9, 2009

How to Take Good Pictures - Part 3

After looking at the equipment that a person should have in photography, as well as some of the rules of composition, let's look at some other practical things that a person can pursue as they try to hone the skill of photography. Some of these may overlap with the "Rules of Composition," and they may be rules themselves, but they are not necessarily directly related to how a person sets a scene up. However, they are almost just as important as the previous rules I mentioned.

Lighting. This, perhaps, is the most important thing to keep in mind in photography. I know that I have said this over and over again about other things, but this one aspect is paramount. I don't know how long it took me to realize it, but lighting in a scene is incredible. Once you realize this, you will never look at any scene the same again. You will constantly be noticing lighting, even if you're simply driving in your car to work, or doing anything else.

Quite simply, the thing to keep in mind about lighting is that it is extremely important what the lighting is like for any scene. Though it applies to any type of photography, it is especially important for landscape photography. Thus, if you want to capture a beautiful scene with your camera, you must take into account the lighting. Put another way: you must consider the time and type of day that you are going to photograph a certain scene.

What does this mean? This means, quite simply, that you will never, and I repeat, never, get a good picture of a landscape scene at noon on a sunny day. Never (did I say that enough?)! 
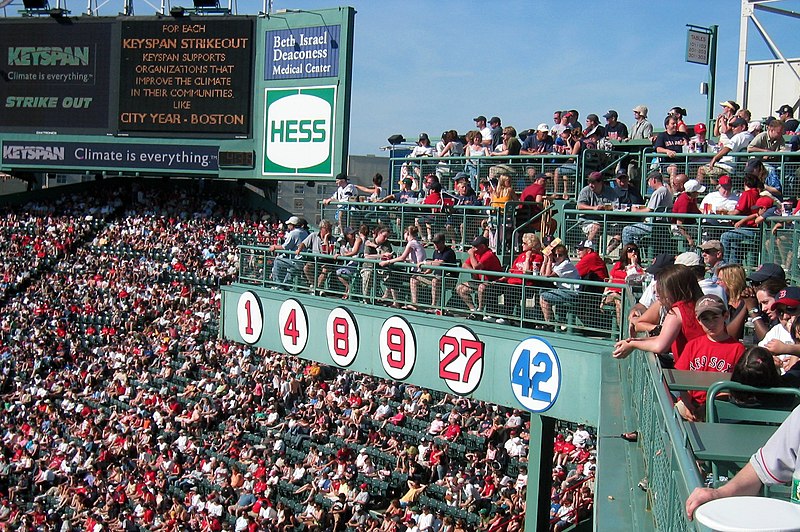
For the most part, you won't take a nice picture at noon on any type of day, but especially on a sunny day? Why? Because noon is when the sun is brightest and directly shining overhead. When the sun is directly overhead, the shadows it produces are shorter, and this cuts down on shape, which produce a more pleasing scene. The scene then becomes quite "flat" and boring. The picture to the right illustrates this. Midday sun tends to be quite harsh, which robs elements in the picture of color and saturation. Morning or afternoon sun enhances color and saturation on the other hand.

Hence, the solution is to take pictures - especially of the landscape variety - early in the morning or later in the afternoon. There is something called the "Golden Hour," which photographers recognize as the best time to take pictures. The Golden Hour is the first and last hour of sunrise each day. Thus, the photographer will always want to keep an eye on sunrise and sunset. During this time, the lighting will generally be "softer" and "warmer" in hue and the shadows will be quite pronounced. This hour is optimal because it provides plenty of shape as well as plenty of color.

Of course, these aren't the only two hours during the day that good pictures can be taken. 
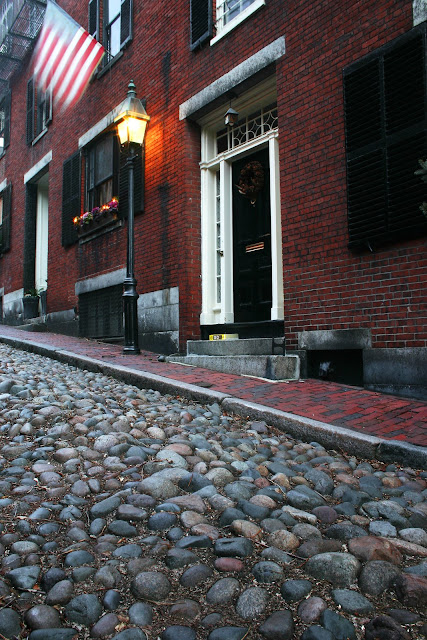
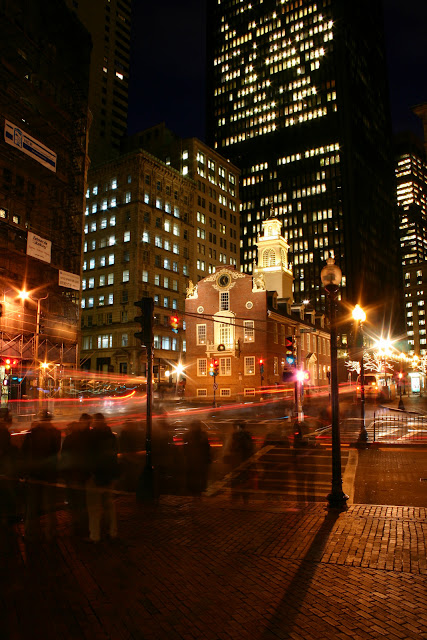
Generally, a person can take fairly good pictures 2-3 hours after sunrise, and 2-3 hours before sunset. Anything in between that is pretty much a lost cause, for all intense and purposes. This means that a person who is serious about photography will want to be an early to rise type of person. This isn't always the case, of course, but if you want to take beautiful pictures you must get up early. I repeat, you must get up early. The picture to the left was taken at 5:43 AM on March 30, 2006. Where I was staying at the time was about an hour away, so I got up at probably 4 AM so I could be at this precise location at this precise time to capture this beautiful scene.

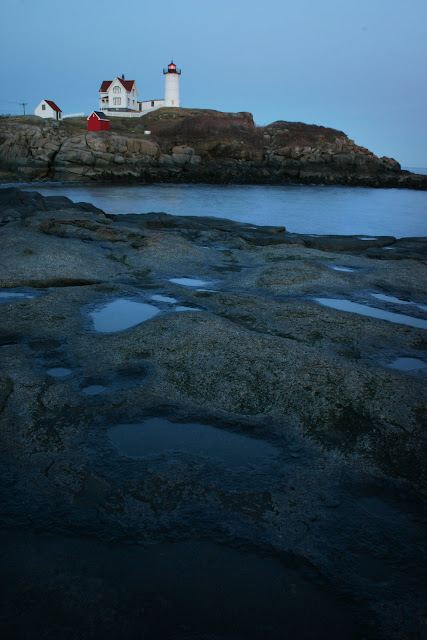
Notice the soft lighting and the pinkish/orange hue that is on the fence. In the right-hand corner is also a bit of the orange light from the rising sun. Had I taken this same picture later in the day, say, around 12 or 1, the picture would have been very "flat" and the colors would have been dreadful. Notice the picture now below, of the same lighthouse, taken in all likelihood sometime around noon. Of course, the scene is set up differently, but you tell me if it was worth waking up at 4 AM to capture the scene I did.

In the picture below, there is very low contrast and the shadows are very harsh. The colors are not rich or warm or soft at all. Very little of this picture invites you in.

This is not to say that you cannot take pictures at noon. But, for the most part, put your camera away in the middle of the day if you care about getting good shots. Instead, check out when sunrise is and wake up earlier in the morning. As an added bonus, very few people are up around sunrise and it can be very peaceful. Very peaceful. Usually, the only other people that are up at sunrise are other photographers and they are usually trying to stay out of the way of other photographers. In the the later afternoon sun, you have to deal with crowds, and those types of people are not eager to stay out of your way.

Together with that, of course, you have to pay attention to where the son is coming from at any particular time. If I had gone to that Lighthouse in the afternoon, with the hopes of getting the exact same scene, I would been sorely disappointed because the sun would have been coming from the other side of the building. Thus, you have to know if a scene is lying eastward or westward. If you want to shoot a scene where the sun would be required to come from the East then, obviously, you will need to shoot in the morning. If you need the sun to be coming from the West to illuminate a scene, then you will have to shoot in the afternoon.

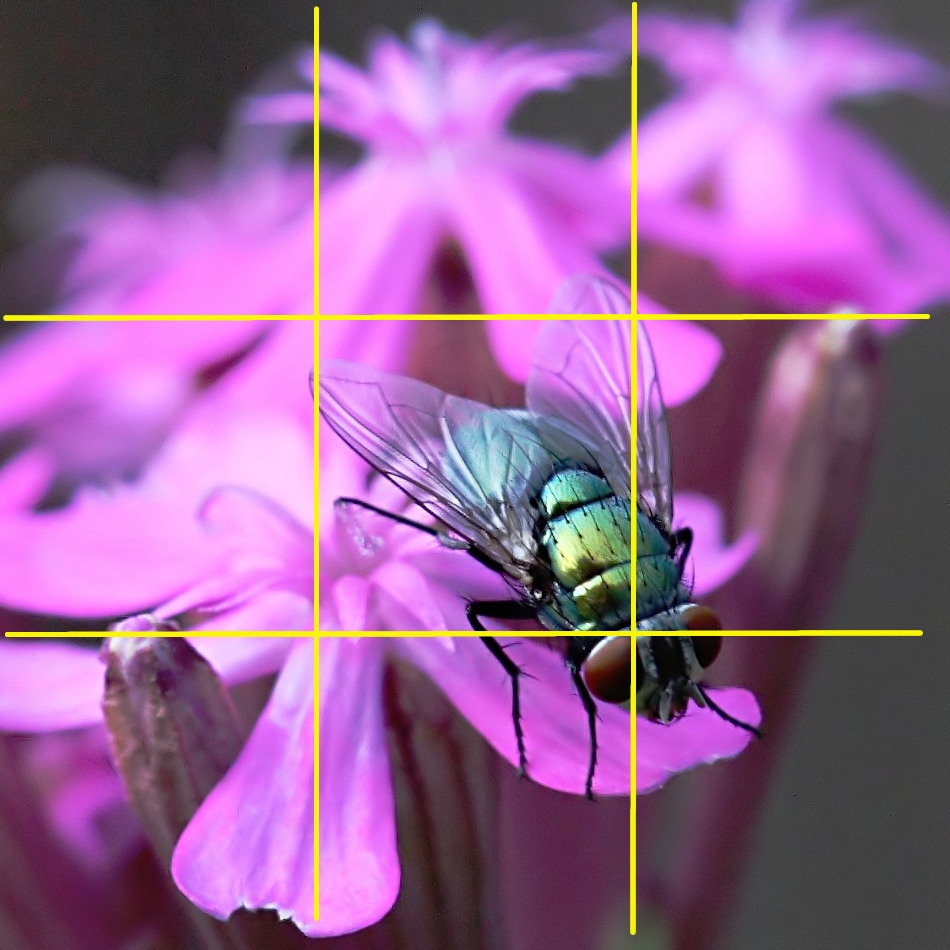
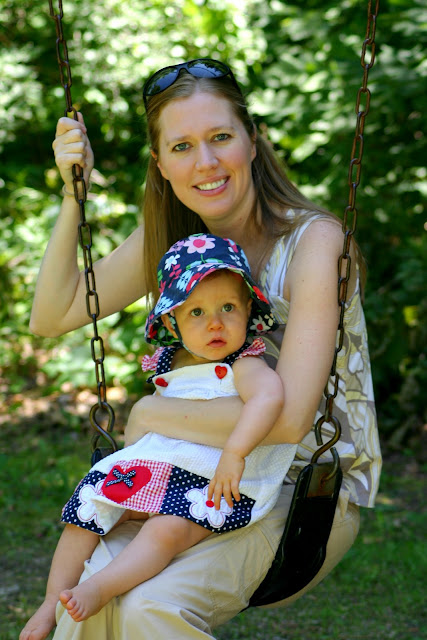
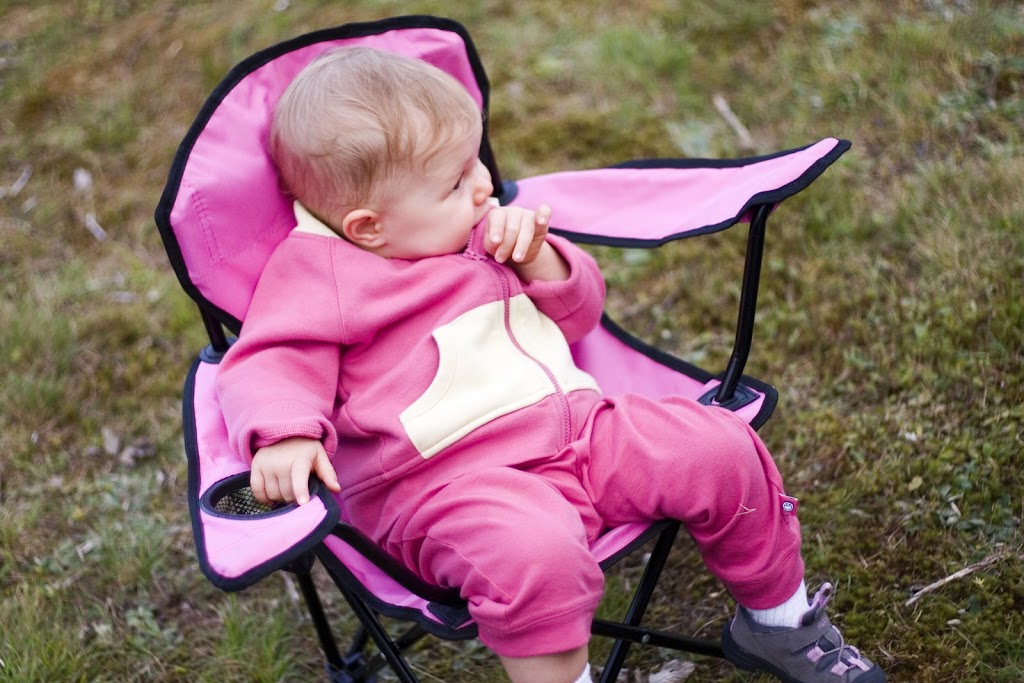
Now, what about when the sun isn't out at all? What about cloudy days? Are those simply a waste? Not at all! They are actually preferable for taking pictures of people, for the most part, and pictures of wildlife and anything that doesn't require a lot of sky. They are preferable for people shots because they eliminate shadows from a person's face, and they are preferable for wildlife because the colors and saturation is actually richer when there is no sun.

What you have to keep in mind, especially, though, is that you should eliminate as much sky as possible. For the most part, steer clear of any type of "vista" scenes - that is, scenes that are wide open and show a large area (like a whole town, or a valley). Instead, focus more on close-ups, eliminating as much sky as possible. The picture to the right is an example of this. I took this on an overcast day, which is often preferable for capturing fall foliage. If it was a sunny day, there would have been more shadows to tell with, and there would have been "sunspots" creeping in. Sunspots are those parts in a picture where the sun has crept in and "blown out" the part of that picture. If you look at the picture below, which is also a picture I took of the fall foliage, you will notice the "sunspots" towards the top of the picture in the middle. This is where the sun crept in and was illuminating that part of the scene. Nothing else in the picture is really being hit by the sun, and since that part is, it causes it to be overexposed. This is why it is preferable to take pictures in the woods on cloudy days. For the most part, you will not be challenged by sunspots that are blown out.And so, if you are really wanting to bring out the rich colors of autumn, for example, cloudy days are actually nice. Like I said, you won't be able to take any scenes in fall that involve sky, but for close-ups, cloudy days are nice.

So, the general rule for lighting us such: if it is a sunny day, wake up earlier in the morning and take pictures during the first 2-3 hours of sunrise. If it is a cloudy day, head for the woods or take pictures of subjects that do not require the sky. In fact, eliminate the sky from any pictures on a sunny day completely.

Thus, a photographer will be a weather-watcher, as well as a sunrise watcher. And, as I said earlier, you will become acutely aware of the lighting of every scene. You will look at a scene, even if you are not actively taking pictures, and say, "Well, the lighting is too harsh right now for a good picture," or, "The lighting should be coming from lower angle in the sky, and maybe from the East, in order to illuminate the subject how I want it to be illuminated." It becomes quite a hobby.

Don't partner up. This sounds a little strange, but I would also say that if you want to take seriously good landscape pictures, especially, you will have to go it alone - that is, unless you have someone else who is serious about photography. If you are touring Europe with your family, for example, you should not have delusions that you are going to take a whole lot of great pictures. If you want to get up at 4 AM to catch the Eiffel Tower in good lighting, for example, but you have only one car, it's not going to happen.

If you're on an afternoon hike with your wife in the White Mountains of New Hampshire, chances are you will not get very many good pictures because your wife may or may not want to stop every five minutes and wait for you to set up your tripod and photograph a bunch of flowers (not that I'm speaking from experience, of course).

Thus, if you want to take good pictures without feeling rushed (you mustn't feel rushed), then you will have to go it alone. If you're a scaredy cat like me, this may be problematic at times. Okay, I'm not really that much of a scaredy cat, but I do remember that one time I was going out to take some pictures of a water fall in Vermont that was out in the middle of nowhere. I drove to this place and had to hike back a half-mile to the place. There was no one else around. So I set up my tripod and and was leaning over the camera to set up the scene, when I felt this wierd sensation running up my book. I immediately jumped up and screamed out, only to turn around and notice this dog, accompanied by its female master, wagging its tail at me. I was a little embarassed, to say the least.

Of course, I was quite startled when I read in Reader's Digest a few years later that some 20 years before a person was murdered at this very water fall. It was probably one of the last murders that has taken place in Vermont in the past 20 or so years!

But the point is: if you want to be able to go at your own pace, then you will need to go it alone.

But do partner up. One of the best things I ever did was to join an online photo community. I am not involved in it anymore, but for the first couple of years after I got into photography, I spent a lot of time in this community. What these communities provide is instant feedback. When you are receiving contructive criticism about your pictures, the learning curve is a lot faster. Of course, you must have thick skin to join these communities. You must be able to take criticism, and this can be especially hard if you are convinced that your picture is awesome.

In addition, you can also see other people's pictures, and read other people's critiques of those pictures. Most photographers will include the exposure settings for each picture that they submit, and so you will be able to get an idea of what shutter speeds work for any type of picture, or what aperture is good. Really, joining one of these communities in invaluable. I don't think that I would have learned as quickly as I did if it wasn't for joining one of these sites.

The particular one I joined is photosig.com. It is free to join, but you are allowed to submit only one picture in the span of a couple of weeks or so. If you offer substantive critiques of other people's pictures, then you can build points up, which then gives you the right to upload more pictures, more frequently. At the same time, if you pay a fee and become a full member, then you are allowed to upload three pictures at a time, in the span of a couple of weeks. Of course, any points you then accumulate because of your critiques will allow you to upload more and more photos. As I said, joining a community like that is invaluable.

Study Good Photography
. This is closely related to the previous point, but it is also extremely important. If you want to take good pictures, you need to be looking at good pictures. One of my favorite things to do is to look at coffee table books. I love coffee table books. Not only does it give me inspiration, but I can also study the techniques that others are using. At the same time, I also gain invaluable insight on how to capture a particular scene.

For example, before I go to a certain place, I may look for pictures online or in books on how other photographers have captured that particular scene. And then I am pretty unabashed about emulating how they have set up the scene, or captured the shot. For the most part, I usually try to capture a scene in the exact same way that I've seen someone else do it. Art imitates art, anyway, and there is no need to be completely original. Of course, as I'm at that particular place, there is a good chance that I am going to take other pictures from different angles, and maybe I'll come up with something original. But there is nothing wrong with trying to emulate what you've seen.

Similarly, when you come to a new place, it is also great to seek out Postcards of that place. You may not know what that particular place has to offer, and looking at Postcards gives you an idea of what may be around there. This is a very healthy thing to do.

Filters. Perhaps the last thing I will mention for now is the use of filters. These can be very helpful. Every photographer should have at least a polarizing filter. This type of filter eliminates reflection from the sun, and darkens colors (especially skies). Thus, if you were taking a picture of a lake or stream, if you use a polarizing filter, it will eliminate the reflection on the water, allowing you to capture what is beneath the water. This can be a very nice effect. The picture below is an example of this. Had I not used a polarizing filter, there would have been a reflection on the surface of the water, and the viewer would not have been able to see the rocks in the water - at least not very well.

At the same time, another good filter to have is a neutral-density filter, but this is not as important as a polarizing filter, in my mind. A polarizing filter can achieve the same thing as a neutral-density filter, while also adding other elements. Essentially, what a ND filter does is it darkens a scene. This can be very preferable if you are wanting to use a slower shutter speed, but it is too bright out to slow it down enough to get blurred motion (like the picture above). But, as I said, a polarizing filter can essentially accomplish the same thing, with the added bonus that it eliminates reflections.

The only other filters, in my mind, that deserve mentioning are graduated neutral-density filters. These are filters where only part of the filter is darkened. Thus, if you wanted to make sure that the sky in a scene was darkened, but the land isn't, then you would use a graduated filter. This would need to be done if the land is already quite dark, but the sky is quite light. You, obviously, wouldn't want to darken the whole scene, so you would just want part of the scene darkened.

But I don't think a graduated filter is important. In fact, I bought one initially but only used it for a short time. With the use of Photoshop and other photo editing software, you can achieve the same effect when you are processing your pictures after taking the pictures.

I will return to Photo editing at a later time. This is extremely important as well. The so-called "Digital Dark Room" is almost as important as taking the picture itself. But we will return to that later.

How to Take Good Pictures - Part 2

So now we're ready to move on to the rules of composition. These are, of course, not necessarily "rules," so much as general guidelines to keep in mind as you are approaching the art.

The Rule of Thirds. This is, perhaps, the greatest "rule" of photography, which most people do not understand. Most people, when they approach a subject, want to place that person or thing right in the middle of the frame. But this is not a good idea. Let me simply quote what has been written in Wikipedia on this subject, and hopefully it will make sense to you:
The rule states that an image should be imagined as divided into nine equal parts by two equally-spaced horizontal lines and two equally-spaced vertical lines, and that important compositional elements should be placed along these lines or their intersections. Proponents of the technique claim that aligning a subject with these points creates more tension, energy and interest in the composition than simply centering the subject would.
Hence, notice the picture to the right (which is not mine). Most people would simply put the fly in the center of the frame. However, when approaching the scene, the photographer divided the scene into nine equal parts, and placed the subject (the fly) in one of the thirds of the frame. This can be achieved by essentially imagining the frame as a tic-tac-toe arrangement. Doing thus, you would want the subject of the photo to lie upon one of the lines on that tic-tac-toe board - in this case, the fly's eyes.

Similarly, if you were to take a picture of a person standing on the beach (like the picture below left, which is not my picture either), you would want the person's body to line up on one of those lines as well. This is the case with anything you photograph. If it is a building, or a road, or whatever the case is, always try to arrange that particular subject to be lined up in one of the thirds of the frame.

The same is true when the horizon is in your picture. You never want the line of the horizon right in the middle of the frame. You want the horizon line to be in the bottom third of the picture (showing more sky), or the top third of the picture (showing more land/sea). The picture to the left has both of these elements. The girl is, first of all, lined up on the right third of the picture, and then the horizon is - for the most part - lined up on the top third of the frame. Success!

At the same time, perhaps it would be well to address something that may come up again later. When you are taking a picture of a person - especially - you must ask yourself how much of that person you want in the picture. Generally speaking, if you are getting the person's whole body in the picture, you then want that person's body to be placed on one of the thirds of the picture (like the picture above). However, if you want a close-up picture (for more formal portraits), it is totally fine to have the person in the middle of the frame. However, the rule of thirds still applies because in the latter case, you still want the person's eyes to be in a third. When we look at people, the first thing we look at is that person's eyes. Thus, it is preferable to make sure that the person's eyes is in one of those thirds (usually the top third).

So how do you make a decision as to whether you take a picture of a person's whole body (thus placing the whole body on a third), or just their face, for example? It depends on the situation. If you want to emphasize where a person is, or what he or she is doing, then you might want the whole body (or most of it), and thus place his or her whole body in one of the thirds. The example to the right, of my niece Calleigh, shows this. I wanted to emphasize the fact that she was walking her dogs, and so, obviously, I wanted to get both her and the dogs in the frame. But I still wanted to keep her in one of the thirds. I also got them, for the most part, in one of the thirds. Notice, also, that her eyes are still in one of the thirds - almost exactly where two of the lines would intersect.

Similarly, if I want to emphasize the fact that my wife is in Paris, then I would take a picture that not only shows her, buth also something from Paris as well. I will put her whole body on one of the third lines, and then place the particular scene where she is located in the other part of the frame. By placing her in only one third of the scene, my eye can be drawn in from the rest of the picture.

On the other hand, if I don't care that much about the where a person is located or what he or she is doing, then it is more likely that I will zoom in and include less of his or her body. In other words, if I am taking a picture of my wife, and I don't care if the person looking at the picture knows she's in Paris or Los Angeles, then I will probably zoom in closer on her. This is especially the case when you are taking more formal portrait pictures. If you just want a nice shot of your wife or girlfriend or son to hang up on your wall, and it doesn't matter where he or she is, then you will want to get as close as possible. Of course, as I said earlier, you still want the person's eyes to be in one of the thirds.

The Rule of Thirds also applies to landscape or cityscape photography as well. If you are taking a picture of a building, for example, you most definitely want that building to be in one of the thirds. This allows the building to be in context, helping the viewer to understand the overall scene, rather than simply the subject itself. Notice, for example, the picture below. For the most part, the main subject of the picture is the covered bridge. But instead of simply having the covered bridge in the picture, I also had the stream in it. The stream leads your eye into the picture, until it ultimately settles on the bridge in the top third of the frame.

By the way, as a bonus: what other photographic techniques did I use in this picture to make it interesting? Answer: I naturally wanted as much of the picture to be in focus as possible. Thus, I used a small aperture (high f-stop), which also forced me to use a slow shutter speed. But that was actually preferable, because that allowed me to blur the water, which was moving, thus producing that nice silky effect.

Less is More. This rule somewhat ties in with something I mentioned in the previous point, but often times less is more. What do I mean? When you approach a scene - whether it is of a person or a skyline or a field of flowers - you want to figure out what the subject of that picture is going to be, and then try to eliminate all the unnecessary components of the scene. In other words, you want to take account of every inch of your frame and make sure that no part of the scene causes the viewer to be confused as to what, exactly, you're focusing on. This is often one of the other most neglected rules.

Take the image to the right, for example, which is not mine. Can you tell me what, exactly, the person who took the picture wants you to focus on? When I look at the picture, my eye naturally races around to pick up on something to focus on. But I can't figure out what the photographer wants me to look at. I'm not sure if he/she wants me to notice all of the fans; or maybe the scoreboard; or maybe the retired numbers; or what, exactly. Actually, if it wasn't for the fact that the person who took the picture said on his/her website that he/she was showing the retired Red Sox numbers, I wouldn't have known that this was the focus of the picture.

If the person wanted to make that the subject of the picture, it would have been better off if he/she had zoomed in more on the numbers, and eliminated the distracting elements of the scene. This doesn't mean that he/she would have had to eliminate all other elements, but keep only those things that are necessary to be able to tell the viewer what these numbers were all about.

Notice, also, the two pictures below - both of the same scene, for the most part. Obviously, there are other things going on in the pictures that cause one to be better than the other, but tell me what the focus is of the first picture, and then what the focus is of the second picture.

Both pictures have water, but whereas the first picture has a lot of water, the second picture has just enough to let the viewer know that this is a water scene. For the most part, nothing in the second picture is unaccounted for, and thus it doesn't confuse the viewer. The viewer knows what the subject of the picture is. The subject (and when we use the word "subject," this doesn't necessarily have to be only a physical subject; the subject could also simply be an idea) is a fisherman in his boat, getting ready to head out to sea. Everything else in the pictures simply sets the scene up, allowing the viewer to know the context in which this is taking place.

The first picture, however, doesn't necessarily tell us what is going on. We are not sure if we are supposed to focus on the buildings, or the water, or the boats, or the buoy. The whole frame is not accounted for by the photographer. There is a lot of wasted space that doesn't necessarily contribute to what the photographer is trying to get us to focus on, or think about.

Thus, every inch of the frame needs to be accounted for. This doesn't mean that you cannot have large parts of a picture that are wide open - like a huge sky. It just means that every part of the frame needs to contribute to the subject or story or feeling or emotion that you are trying to emote from any picture.

Another shot I took from this same scene is to the left. I have a lot of sky in the shot. But what does that sky tell you? The sky tells the story that this is an early morning setting, and the sun is just coming up. Because there is pink in the clouds, this alerts the viewer that the scene is in the morning, and the Harbor (in this case, Boothbay Harbor, Maine) is just coming to life.

Thus, if you are going to have large parts of your picture that is the same thing (ie, sky, water, open field), that part must contribute to the story that you are trying to emote in that scene. A lot of sky in a picture may give the sense of a wide-open vista scene, for example. Or a lot of water (in an ocean-scene, for example) may emote the feeling of bigness or vastness.

When I take a picture, I am actively trying to focus in on only those parts that I need. I hate wasted space - parts of the frame that contain only one element. In the picture above (the second picture in the series of two), had the area to the left of the island been wide open, with only water or sky, for example, I probably wouldn't have been excited about the picture. But because there are buoys and other boats in the water, and there is a building in the far shore, I took the picture. These things don't necessarily distract from the main subject of the scene because of where they are positioned in the frame, but they also provide a context for the fisherman and his boat. Wide open water would have told the viewer, "Okay, there is water there: but why do I need to see so much of it?"

Thus, to reiterate it: less is more. Try to eliminate anything in the frame that is not necessary to the overall explanation of what is going on, or the scene you are trying to capture.

Framing. This idea is closely related to the previous two points that I mentioned, but it can go a long way in helping the viewer understand the context in which the scene is located, as well as forcing the viewer's eye to focus on the main subject of the picture. Framing occurs when you take natural elements in a scene that can set a "frame" around your main focus. One of the most common ways that this is accomplished in a city or landscape scene, is by including a tree or branches in the foreground of the picture. This thus turns the viewers eye towards the main subject of the scene. The picture below of Dartmouth College illustrates this.

The main subject of the picture is the building (and more specifically the door), but in order to get the viewer's eye to focus on the door, instead of the rest of the building, I utilized the leaves to frame the picture and turn the viewers eye towards the door. Of course, the leaves also served as an added bonus because, since they are yellow, it tells the viewer that this is a fall scene. But because the leaves on top do not take up most of the picture, nobody would believe that there are the main focus of the shot. The viewer knows that they are simply there to lead your eye to the main focus.

At the same time, it also helps, of course, that the door is in one of the thirds! This allows the eye to look at the rest of the picture, understanding the context of what is going on, before settling on the door.

The next picture below also utilizes a natural frame to get the viewer to focus on the main subject - namely, my brother-in-law and niece. That the leaves in the foreground are out of focus (not to mention all other elements of the picture besides to two of them) also helps direct the eye towards the main subject, since they are the only thing in focus.

With this picture, it's almost as if the out-of-focus leaves in the foreground serve as a "funnel" that naturally funnel your vision towards Calleigh. Your eye doesn't wander around the rest of the picture and settle on anything else (unless you purosely and consciously do so). Yet, at the same time, the rest of the scene does allow you to understand the context in which Duncan and Calleigh are in. They are in a field, picking raspberries. If I simply wanted to take a picture of Calleigh, and not tell the viewer what she was doing, I would have focused closely on her and eleminated everything else.

Go Crooked. This last rule of composition is anything but a rule, and it applies only to a certain type of photography. I have never learned it in a class, or seen someone explain its purpose on a website, but I started noticing a couple of years ago that when wedding photographers, or photojournalists, or advertisement photographers, took pictures of people, they often tilted the camera little bit. Thus, instead of getting a straight image, the scene would be titled a little bit (the above picture is an illustration of this).

I am not sure what this accomplishes, or why it is necessarily more interesting than a straight-up-scene, but it does something to the eye that is out of the ordinary. It may just be that it provides a perspective that we don't typically see.

As I said, this should only be done with certain types of photography. You won't want to do this necessarily with landscape or cityscape shots. And, generally, you probably won't do this for formal portrait pictures. But it is a very good technique for candids and photojournalistic scenes (in other words: if you were taking pictures of soldiers in Afghanistan for a newspaper). For the most part, I use this technique almost all the time when I am taking candid shots and I have found that it adds a lot of interest to the scene. Notice the picture below to see what I'm talking about. And perhaps someone who is more inteligent than I can tell me why this is more interesting to the viewer than if the person were simply straight in the shot.

Now, for the most part, you don't want to go "buck wild" with how crooked you take the picture. Just tilting your hands slightly should be enough. But, of course, you can experiment with this technique and decide what is best.

So these are probably four of the main rules of composition that I want to hit upon. There are other important parts of course that I could mention, of course, but these four things are probably four of the most important rules of composition that I keep in mind (or subconsciously do) when I'm taking pictures. For other tips on composition, type of "Rules of Composition" in a Google search and you'll come up with all kinds of other helpful suggestions.

Now we'll turn to some other practical things you can do to improve your photography. For that, we go to Part 3.

How to Take Good Pictures - Part 1

Someone asked me recently about how to take good pictures. The implication was that I knew how. The simple answer is "practice," and though there is a lot of truth to that, others have reminded us that it is not practice that makes perfect, but "perfect practice" that makes perfect. And so, what we need to figure out is which techniques we should be practicing, and then seek to emulate those techniques each time we get behind the viewfinder.

And so, I am going to try to address some of the basic rules of photography that I have learned over the past 5 or so years. This is certainly not exhaustive, but if I were to give a bare-bones explanation of what I view to be the most important elements of photography, this is what I would come up with. Hopefully this will be somewhat systematic and organized. But this is kind of the first introduction to photography that I've ever shared, so please bare with me. I can't necessarily give you a dissertation on the technical components of photography, but hopefully what I offer will be helpful.

So let's start with the essentials.

The Camera. Probably the single biggest question people have for me - or other photographers - when they are impressed by a picture is: "What kind of camera do you have?" The short answer is that it doesn't really matter. It is not the camera that takes good pictures, it is the person behind that camera. A good photographer can take good pictures with a disposable camera, or a $5000 digital SLR camera. (SLR stands for "Single Lens Reflex," and to the layperson, it is essentially a camera that has detachable lenses.)

On the other hand, there are certain things you can do with a digital SLR camera that you cannot achieve with a point-and-shoot camera. Being able to control your exposure is perhaps the most important one. This allows you to vary your depth-of-field (which we will return to later), and that is one of the most important parts of photography, in my opinion.

So I would recommend to a person that they buy a digital SLR camera if they are wanting to get serious about photography (or even semi-serious). Although they are more expensive than an 'ol fashioned film SLR camera, in the long run it will be more cost-efficient. Not only are film cameras a thing of the past, but it costs a whole lot more money to operate one over the span of a couple of years. You may be able to find a decent film SLR camera for $200 or so, but when you take into account buying and developing film, the cost increases very quickly.

At the same time, the learning curve on a digital SLR is so much better because you have instant feedback on what you did right or wrong in a picture. When you have to wait a week or so to develop your film, you hardly remember what you did when you shot the picture, and so you don't learn and get better as quickly.

So what cameras would I recommend? There is an endless rivalry between Canon and Nikon, of course, but these aren't the only two brands on the market. However, I would probably recommend staying within those two brands because they have far more lenses available than other brands (like Pentax, for example). And lenses is really where it's at. I just bought a very inexpensive Canon lens this past summer for around $80, for example, and the same type of lens for a Sony camera was $280! Now, the Sony lens may have been better quality, in the end, but the point is that there were no lenses for Sony with the same specifications that I had for my Canon.

I, myself, am a Canon guy, because that's just what I started out with. And once you commit to a brand, you will probably stick with it because you don't want to keep having to buy new lenses for whatever brand you get. And so, if you are just starting out in photography and you'd like to get a digital SLR, I would recommend the Canon Rebel XSi. With Canon's generic lens, you can get it online for about $630 or so (available from Amazon for $648 here). The XSi is Canon's entry-level digital SLR, but it is really a high-quality camera. It will pretty much do all that you want to do, for the most part, even if you are a professional or semi-professional photographer (depending on what type of photography you are involved with).

Of course, as I said, Nikon is good as well. And, though I don't know as much about Nikon, I would guess that its Nikon D60 would be comparable to Canon's XSi (available here). So when it comes to Nikon or Canon, you really can't go wrong. Either one is good. It's just a matter of preference.

Before I finish with this section, let me just say a word or two about vendors. You need to be very careful about where you purchase your cameras and other equipment. If you go on Pricegrabber or other similar sites, there are other vendors that will sell you a camera for $100 cheaper than anywhere else. Usually, if something is too good to be true than it usually is. If you purchase from then, many times they are selling you the camera only, without batteries, or chargers, or other essentials. And then they will call you up to "confirm" that you will purchased the camera, and then try to sell you all these other ad-ons. You may finally get the camera, but it will be weeks after you initially purchased it, and after a great deal of hassle.

It is pretty well established that there are certain sites which are dependable and good. Perhaps the leading one is B & H Photo, which is out of New York. They are, far and away, the leading site in this particular industry, and they are very dependable. Their prices are usually a bit more expensive than other sites, but I usually always start with them. Sometimes I purchase from them if I don't want to deal with any hassling in other places, or sometimes I just use them as a price comparison.

I do also a lot of purchasing from Amazon.com. Sometimes the stuff is directly from their site, or oftentimes it is from third-party sites that sell through them. Amazon usually has some of the cheapest prices I've come across, yet they are very dependable and you know what you're getting. I also have free two-day shipping with them, because I'm a Prime member (about $70 a year), so when I purchase something from there, you get it very quickly. I've had only one experience with them that they didn't get it to me within two days, and that was more UPS's fault than theirs. With the Prime Membership, they will also overnight anything for you for, like, $5 an item - so that's a steal as well.

Lenses. As I mentioned earlier, lenses is where where it's at. The actual camera is important, but not as important as the lenses. Unless you are wanting to get into photography professionally, don't worry about buying a camera for $2000+. Putting money into lenses is perhaps more important than what camera body you have.

Here, it is a matter of what type of photography you are doing. Unless you buy a camera body only, the lens that comes with a camera will usually be something like an 18-55mm zoom lens. The 18mm part means that it is a fairly wide angle (meaning you can get more of a scene in a picture). The 55mm means you can zoom in a little more, and get a little closer in on the subject. However, it is not going to be as much a zoom as you may prefer.

Generally speaking, if you are interested in taking landscape or cityscape photography, you will want lenses that have wider angles. You will want the ability to get more in the picture, and so an 18mm lense or less is preferable. This is not always the case, of course, but when I'm taking a landscape or cityscape scene, I want a wider angle lens so that I can get more in the picture (th image to the right is an example. This was a very tight scene, and in order for me to get the street and building in the same frame, I had to be at about 18mm).

On the other hand, if you are taking pictures of people, you will probably want to use a longer lens. This allows you to get only those elements in the frame that you want and, as we will discuss below, it allows you to focus only on the subject that you are taking, blurring all other elements. The picture to the left is an example of this. I took this picture of my sister and her daugther this last summer with a 75-300mm lens, and it was at about 300mm. I could have gotten closer to her and shot it at 75mm as well, and probably gotten the same effect, but 300mm blurs the background even more, thus making the subject stand out even more.

We will return to this topic a little later, but when taking pictures of people - especially if they are portraits - it is vitally important to zoom in on that person(s) as much as you can, cutting out any other elements. A longer lens allows you to do this. At the same time, it is also extremely important to have a small depth of field. This blurs all the other elements in the picture, and causes the subject to stand out more. We will return to this below.

This is probably what's most important about the subject of lenses. Perhaps the only other thing to say is that there are two different types of lenses: zoom lenses or prime lenses. Zoom lenses obviously have the ability to use different focal lengths. Thus, you can use a zoom lens to be at 18mm, for example, or 55mm. Prime lenses, on the other hand, are fixed in theri focal length. I have a 50mm prime lens, for example. That means that I cannot zoom in any closer than 50mm. The only way to achieve a closer crop is to actually get physically closer myself.

Each type has its advantages and disadvantages, but, generally speaking, prime lenses are actually a little more expensive and have their advantages. One of those advantages is that they have a fixed aperture (f-stop). We will return to this later, but for our purposes now, the advantage of having a fixed aperture is that, no matter what, you know how much light you will be able to let in through your lens. And this is highly advantageous. Again, more on this later.

The tripod. I will not spend a great deal of time on this here, but I will say that this is actually a very important topic. The tripod is, perhaps, the most underated part of photography. It took me a couple of years to realize its importance. It didn't make sense to me initially, but there are two big benefits of using a tripod. 1. It slows the process down. When you set your camera on the tripod, it actually forces you to slow down and you sometimes notice things you wouldn't otherwise notice if you were just holding the camera in your hand. Similarly, usuing a tripod and slowing down allows you to frame the picture in a way you maybe wouldn't be able to accomplish if you're just going the hand-held route.

2. Using a tripod allows you to use slower shutter speeds and, subsequently, makes your pictures "sharper." We will return to these two things later but, suffice it to say, being able to slow down your shutter speed and still have a sharp picture if very important.

So, use a tripod (especially if you want to take scenic/landscape/cityscape pictures). This will single-handedly improve your photography ten-fold. I am not going to get into the whole "what type of tripod" should you use. This is important, too, but you can find plenty of resources on other websites for that. Suffice it to say, however, it is vitally important that you do use a tripd - any tripod - when shooting.

Together with that you should have a wireless remote for your camera. Whenever you use a tripod you'll want to use this remote. This is because you want to have minimal contact with the camera when the exposure is being taken. The less you touch your camera, the less it will shake or vibrate, and the sharper the image will appear.

But now let's talk about the basics of actually taking a picture.

Exposure. I don't want to go into all the technical aspects of how exposure is defined, but essentially, exposure is definied by how a camera captures light. There are two elements that make up exposure: aperture and shutter speed. The aperture is the hole in the optical system that either gets larger or smaller, depending on how big or small you make the aperture. If the hole is larger then, obviously, more light will come in. If it is smaller then, obviously, less light will come in.

But the other part to it is the shutter speed. This is essentially the speed at which your shutter opens or closes to let that let go in through that aperture or hole. So, obviously, the longer your shutter is open, the more light will get in, and so on. Thus, in order to achieve the proper exposure (letting the right amount of light in), the aperture and shutter speed need to correspond appropriately.

How does a person know if there is enough light getting in, and whether the aperture and shutter speed are in the right relation? SLR cameras have what is called a "light meter." If you were to look through the viewfinder, you would notice this meter at the bottom of the "screen" (there is an example of this in the picture to the right). Though this picture doesn't show it, when you press the release button half way, a little arrow will start blinking below the light meter, and you will then try to get that blinking arrow right in the center. This is accomplished by moving changing the aperture or shutter speed or both. On digital SLR cameras, you can only change both if you are in the manual "M" setting mode. Otherwise, you will be able to change only the shutter speed (Tv mode), or the aperture (Av mode), or neither. The latter happens when your camera is set to any of the modes that has a picture (like the picture of the face, or the mountain, or flower, etc.) and the camera figures out the exposure for you. Thus, you don't have to worry about the shutter speed or aperture and the camera will allow the proper amount of light in automatically.

This is what most people do who are not experience photographers. And that is fine. There are a few problems with that, however. The first is that the camera doesn't always do the best job of letting in the proper amount of light. At the same time, even when you do it manually, the center line on the light meter may not be exactly what you're looking for, either, and sometimes you want that line to be a little to the right of the center (allowing more light to come in - this is called "overexposure"), or to the left of the line (allowing less light to come in - called "underexposure").

Aside from that, controlling your own aperture and shutter speed is extremely important. We'll deal with one, and then we'll deal with the other.

First, the size of your aperture determines the amount of your picture is in focus. Don't ask me about the physics of this, but the smaller the aperture/hole, the more of the picture will be in focus. This is usually preferable for a lot of pictures, but there is a catch. As we talked about before, if the hole is smaller, then that means there isn't as much light that is coming in. So, in order for you to have more light come in, you must slow the shutter down. But when you slow the shutter down, this makes it so that the camera is a lot more susceptible to shaking and movements. Thus, if you want to have a small aperture, this will slow the shutter down, thus usually making it necessary for the camera to be placed on a tripod so that it doesn't shake or vibrate as much.

What may be more confusing is that the size of the aperture and the number of the f-stop seem to be backwards. Thus, when you have a very small aperture, the f-stop is actually higher than when you have a very large aperture. So you need to think opposite. If you want to have more of your picture in focus, you will want to have a smaller aperture - which is actually a higher f-stop number. Thus, a small aperture, for example, would be something like f/22, whereas as a large aperture would be f/4. Like I said, this is a bit backwards, but just think: more in focus, higher f-stop number; less in focus: lower f-stop number.

So why would a person want a smaller aperture/higher f-stop? This is usually preferable when taking landscape/cityscape pictures. When taking nice scenic pictures, you typically want as much as possible in focus. The image to the left is an example. I wanted as much of the scene in focus as possible. Not only did I want the foreground (rocks/puddles) in focus, but I also, of course, wanted the lighthouse in focus as well. Thus, my f-stop for this picture was f/22, allowing me to get as much of the scene in focus as possible. You don't necessarily have to go that high with your f-stop, but that's what I did. Anytime you get to f/9 or above, you are usually getting into good territory.

So why would a person want less of the picture in focus? Isn't focus good? Not necessarily, and this is the single biggest problem I see with inexperienced photographers. It is also the problem with point-and-shoot cameras. Point-and-shoot cameras usually have a pretty wide angle, and they also have a pretty large depth of field (high f-stop). Why is this problematic? Because most people take pictures of people, and in order to achieve good results when taking portrait shots or candids, the less that is in focus in a picture, the better. There are exceptions to this, but generally speaking, when taking portrait or candid shots of people, you only want to person or persons to be in focus. You want everything else to be blurred.

As I said, this is what many people do not understand. They get this really nice camera, hoping that they will be able to take wonderful pictures of their friends and family, and then they wonder why their pictures aren't as good as the wedding photographer that took pictures of their cousin at his wedding. This is because, time and time again, the "inexperienced" photographer simply turns the camera on automatic mode (which doesn't always give you a low f-stop) or they do it manually but, their f-stop is something like f/7 or f/9. That aperture setting is not going to blur enough of the other elements of the picture. It is not going to do the trick.

As a general rule, when I am taking a picture of someone, I usually have my f-stop at the lowest possible number the lens will allow me. This will create a "shallow depth of field" (the amount of the picture in focus) and cause the person in the picture to stand out. And this is somewhat the problem with zoom lenses. They don't have a fixed f-stop and when you zoom in on a subject (which is good) the minum f-stop will often go from f/3.5 or lower, to f/4 or f/5. But when you have a fixed lens, you know that that low f-stop will always remain the same, thus guaranteeing that you will be able to have a shallow depth of field.

Notice the two pictures below. Look at them and tell me which one causes the subject to stand out more.


Now, the two pictures aren't exactly the same, of course. It's not like there are the same exact pictures, one with a shallow depth of field and the other without. But I think you get the point. In the second image, my niece Calleigh stands out more because she is the only thing in the picture that is in focus. The grass is totally out of focus. When you look at a picture, your eye naturally searches for something in focus. And so, if everything is in focus, then it will not necessarily go right to the subject of the picture. And that is not good. You want your eye to be drawn to the subject of the picture, and that subject needs to be in focus, first of all, and it is preferable if everything else is out of focus.

Now some may wonder: why would you ever worry about shutter speed, then? Quite simply, shutter speed can be extremely important when you want to either freeze a scene that is going fast (like an athlete), or give cause certain other elements to blur. The picture to the right is from the Boston Marathon. For obvious reasons I wanted to be able to get the woman in focus, but in order to do that I needed to have a very fast shutter speed. Otherwise, if my shutter speed was not very fast, she would have been blurry and out totally out of focus. Sometimes this is a nice effect, but generally when capturing people in action, you want to be able to stop them in their motion. Thus, when a football player is barreling down the sideline, you want to be able to "stop" him in his tracks, and this means that you have to have a fast shutter speed.

Achieving a fast enough shutter speed may be tricky, though. Sometimes it is not always easy to figure out just how fast is fast enough. And if the place where you are shooting is low lighting, then it may be hard to get a very fast shutter speed because, as you will remember, if you have a fast shutter speed, then it means that less light is getting in.

So how can you tell if you have enough shutter speed to stop action? I am not sure that I can totally explain it myself, but from what I understand, the speed of your shutter must be at least equivalent to the focal length of your lens that you are shooting with. Thus, if you have a 55mm lens, then your shutter speed must be at least 1/55th of a second. If you are shooting a scene at 300mm, then your shutter needs to be at least 1/300th of a second. More is preferable, of course, but this is the starting point.

However, what complicates matters a little bit is that with lower-end digital SLR cameras (like the Canon Rebel XSi or the Nikon D60) there is something called a cropping factor. Sensors on these cameras actually cause the focal length to multiply by 1.7 or so. Thus, if I have a 55mm lens, it is actually really equivalent to about 94mm, and I would thus need to have my shutter speed to be at least 1/94th of a second if I want to stop action.

There are many times when a slow shutter speed is preferable, on the other hand. This is often the case when you want to blur motion. Sometimes that is a neat effect. For example, if you take a picture of a waterfall, in order to portray a sense of movement and cause a very nice silky effect in the water, you will want to slow the shutter speed down. The picture to the left shows this perfectly. I actually slowed the shutter down to 2.5 seconds to get this effect, and with that reality, you can see why it is vitally important to use a tripod. Nobody that I know can hold anything in their hands completely still for 2.5 seconds.

This slow shutter speed is also a nice effect when you're in the city, and you are wanting to emphasize the busy and bustling motion of city life. The picture to the right shows this. This is of the Old State house in Boston, taken with a shutter speed that actually lasted 13 seconds. Many times, a slow shutter speed can cause a nice effect, and as a person gets more well-versed in this technique, they can experiment with various scenes.

So that is probably all I will say about exposure at this point. But just to review:
  • Large depth of field (high f-stop) is generally good for landscape and scenic shots, where you want a lot of the scene in focus
  • Shallow depth of field (low f-stop) is vitally important for pictures of people, where you want the subject to stand out
  • Fast shutter speed is necessary for stopping motion. This is often the case when taking pictures of people - especially if they are moving
  • Slow shutter speed is nice for emphasizing motion and blurring things such as water, cars, lights, people, etc
  • Large depth of field/slow shutter speed: you definitely need to use a tripod and wireless remote
  • Shall depth of field/fast shutter speed: you don't necessarily need to use a tripod (especially if you are simply taking candid shots), but it can still be handy
Now, let's move on to some rules of composition which, even if you do not understand exposure (or you simply put the camera on automatic mode), can go a long way in improving your images. So let's go to part 2.

Thursday, October 16, 2008

Photo of the Day

Yesterday was actually probably one of the best photographic days for me of the fall, and I had no intention of taking many pictures. When I went to the library at Dartmouth College for a few hours, I noticed some amazing scenes around campus. So I had to take my camera out and start snapping away. Well . . . one thing led to another and I returned to find a $10 parking ticket on my car - which was placed there 2 minutes before I arrived. Oh, well. It was time well spent.

Later on in the day, I found a few other places where I captured some nice pictures as well. I guess oftentimes, you find the best photography opportunities when you aren't looking for them.

The picture below is a pretty typical Ivy League scene (please click on the picture for a larger view of the image). Your comments are encouraged.

Tuesday, October 14, 2008

It's the Most Wonderful Time of the Year?

I have become keenly aware of the fact that fall, though my favorite time of year, is also the hardest season to photograph. It can get downright frustrating, in fact. It is always of the utmost importance to have good lighting when capturing an image, but it is even of a greater importance in the fall.

Not only that, but the fall colors only last so long. "Peak" colors may be 2 weeks, or 2 days. They don't last much longer than that and, although you can still take pictures of the fall when it is not peak, those "postcard" images that we all have in mind are hard to capture.

And I am not sure that I have figured out how to really photograph the fall colors. Time and time again I come away frustrated by my pursuits! I need help.

And that's my photographic reflection for the day.

Tuesday, October 7, 2008

Welcome!

Though I do not watch much TV at all, I feel like CBS, where every show is some type of spin off of CSI. This is now my fourth "blog" that involves the title "New England Pastor." I was posting my thoughts on photography on my original blog, the plain old sounding "New England Pastor," but I decided to start another blog that can be purely devoted to my photography musings. I don't necessarily mean to compartmentalize my life, believing that each part of life should be tied in with every other part, but I want to spare those who come to my original blog for theological meat.

I don't now how much posting I will be doing on this site, but it is at least my intention to check in from time to time with my thoughts and reflections.

I will also say that I am not anywhere near a professional photographer. I do enjoy it a lot, though, and I feel like I am semi-decent at it. This is not to say that any of my pictures are spectacular. In fact, they are probably no different or better than any other pictures of New England you have seen. But I'm okay with that. In my photography, I am not striving to be all that original or creative. I just want to capture New England scenes (mostly, although I of course take pictures when I'm in other places - though that doesn't give me as much excitement) in a way that uplifts its beauty and makes people yearn for this wonderful place more. I also want to capture candid shots of my loved ones in a way that they can enjoy as well.

So, please return again very soon.

Until my next post, here is sneak-preview of what I enjoyed last week.

Peacham, Vermont
Groton, VermontWaits River, Vermont